The Simplify path feature in Illustrator helps you remove unnecessary anchor points and generate a simplified optimal path for your complex artwork, without making any significant changes in the original path shape.
Simplifying path gives you the following benefits:
- Easy and accurate path editing
- Reduced file size
- Faster file display and printing
When do I need to simplify a path?
- To remove imperfections in the traced path when using Image Trace.
- To edit only a portion of the complex artwork and to create sharp or smooth paths in a selected artwork region.
- To reduce the number of anchor points when expanding a shape using the Variable Width tool in Illustrator.
- To edit an artwork created using mobile apps for drawing, painting, or sketching and then imported in Illustrator.

Simplify the path automatically
-
Select the object or a specific path region.
-
Select Object > Path > Simplify
The unnecessary anchor points are automatically removed, and a simplified path is calculated.

Simplify the path manually
To further simplify and fine-tune the path, use the Reduce Anchor Point Slider. By default, this slider is set to an auto-simplified value. The position and value of the slider specifies how closely the simplified path matches the curves of the original path.
- Minimum Anchor Points (
 ): When the slider is close or equal to the minimum value, the anchor points are less, but the modified path curve will have some minor deviations from the original path.
 - Maximum Anchor Points (
 ): When the slider is close or equal to the maximum value, the modified path curve will have more points and a closer fit to the original curve.

Advanced simplification controls
To open the Simplify dialog with advanced options, click More Options ( ).
).

Example: Simplifying and editing the path using advanced options
In this example, we’d try to achieve the following using the Simplify Path dialog:
- Reduce anchor points of a selected region.
- Create sharp corner angles in a selected region.
- Convert the path to straight lines in a selected region.
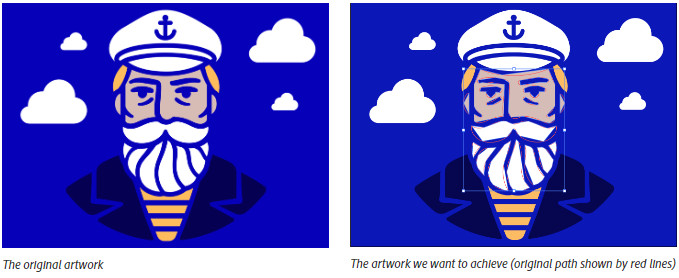
This is how we achieved the desired artwork

Create smooth paths
You can use the Smooth tool or the Smooth slider to smooth paths.
Use the Smooth tool
After you reduce the number of anchor points, you can use the Smooth tool to remove stray points and get a smoother path.
To create a smooth path, follow these steps:
-
Select the object.
-
Select the Smooth tool.
-
Drag the tool along the length of the path segment you want to smooth out.
-
Continue smoothing until the stroke or path is of the desired smoothness.

Create smooth curves
To get a smooth curve while keeping the opposite curves intact, follow these steps:
-
Select the Anchor Point tool.
-
Press Option or Alt and click any of the handles to pair the opposite handles and make the point smooth.
Control smoothness level
To change the amount of smoothing, double-click the Smooth tool and set the following options:
Fidelity
Controls how far you have to move your mouse or stylus before Illustrator adds a new anchor point to the path. For example, a Fidelity value of 2.5 means that tool movements of less than 2.5 pixels aren’t registered. Fidelity can range from 0.5 to 20 pixels; the higher the value, the smoother and less complex the path.
Smoothness
Controls the amount of smoothing that Illustrator applies when you use the tool. Smoothness can range from 0% to 100%; the higher the value, the smoother the path.

A. Corner points with unpaired handles B. Opposite handles paired, resulting in a smooth curve
Use the Smooth slider
For better smoothing control, use the Smooth slider. Select the path, navigate to Object > Path > Smooth, and move the slider to achieve the required level of smoothness. You can also select the auto-setting icon to smooth out the path automatically. To smooth a section of the path, select the anchor points in that section using the Direct Selection tool, and then move the slider.