
Microsoft Teams stores temporary files (cache) on your Windows computer to help the app load content and run smoothly. If the desktop client is slow, gets stuck loading, or shows a persistent local interface issue, clearing its cache may help. The steps depend on whether you use New Microsoft Teams or the older Classic Teams app.
How to clear the cache in New Microsoft Teams on Windows
New Teams uses a different cache location from Classic Teams. Follow either of the methods below on Windows 10 or Windows 11.
Method 1: Delete the Teams cache files
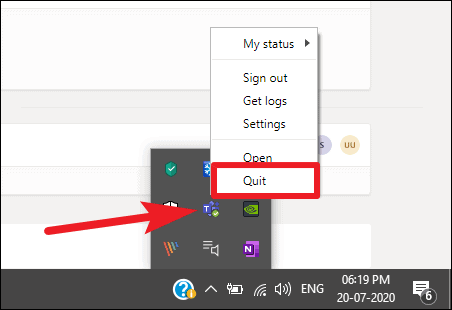
- Quit Microsoft Teams completely. Right-click the Teams icon in the notification area of the Windows taskbar and select Quit.
- Press Windows + R to open the Run dialog box. Copy and paste this path, then press Enter:
%localappdata%\Packages\MSTeams_8wekyb3d8bbwe\LocalCache\Microsoft\MSTeams
- In File Explorer, select the files and folders inside this location and delete them. Do not delete unrelated folders elsewhere in your Windows profile.
- Reopen Microsoft Teams. The app will rebuild its cache, so the first launch may take longer than usual.
Method 2: Reset New Teams through Windows Settings
- Open Settings > Apps > Installed apps.
- Find Microsoft Teams, select the three-dot menu (…), and open Advanced options.
- Under Reset, select Reset, then restart Teams.
Important: Resetting the app deletes locally stored app data, including certain personalization settings. You may need to sign in again or reconfigure some preferences.
How to clear the cache in Classic Microsoft Teams (legacy version)
The original Teams desktop client uses the older %appdata%\Microsoft\Teams directory. The screenshots below illustrate the Classic Teams interface.
Step 1: Close Microsoft Teams
Right-click the Teams icon in the Windows taskbar notification area and choose Quit. Make sure the application is no longer running before deleting any files.
Step 2: Open the Classic Teams cache directory
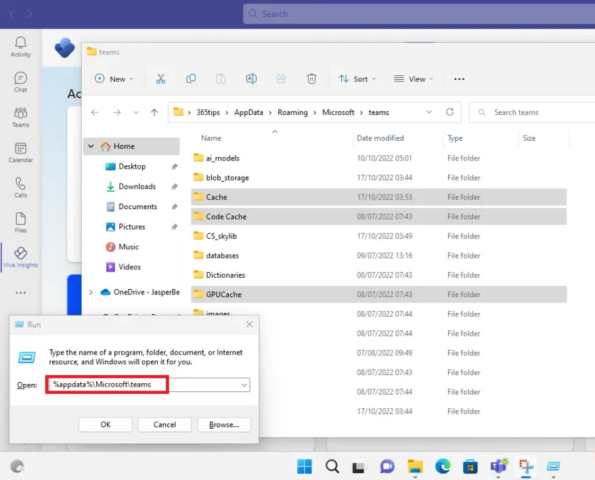
Press Windows + R, enter the following directory in the Run dialog box, and select OK:
%appdata%\Microsoft\Teams
Step 3: Remove cached files and restart Teams
Inside the Teams directory, delete the Cache, Code Cache, and GPUCache folders, as shown in the original guide. For a complete Classic Teams cache reset, Microsoft’s instructions recommend deleting all files and folders inside the Teams directory.
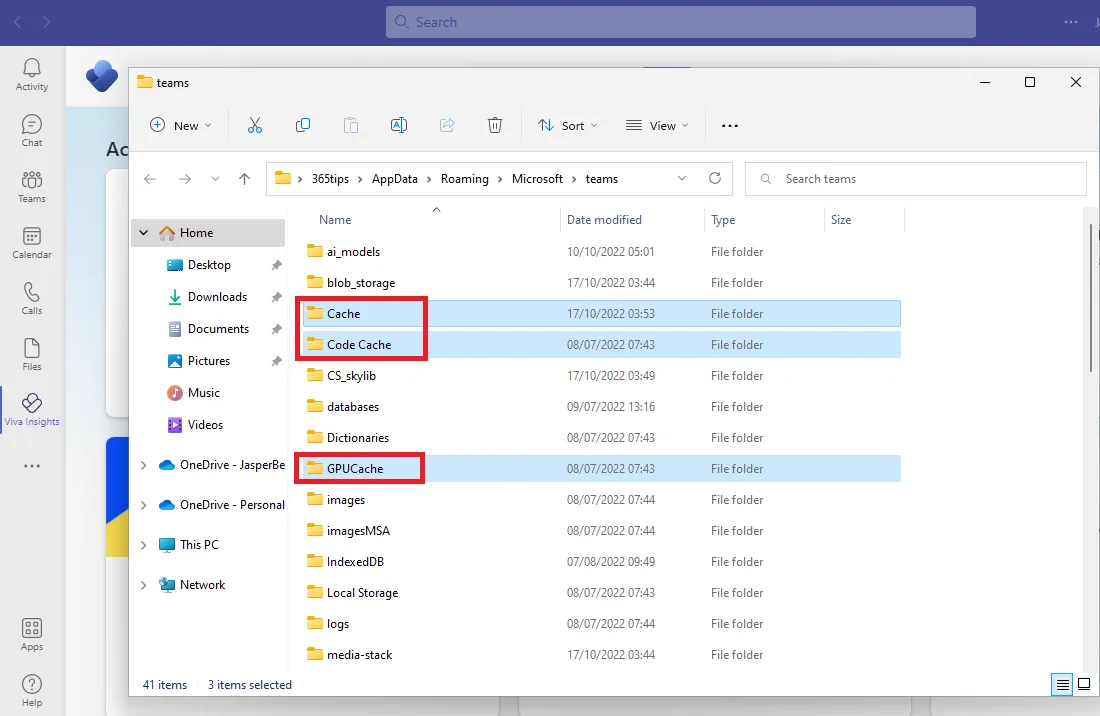
Restart Microsoft Teams or reboot your computer. Teams will recreate its temporary files automatically.
When should you avoid clearing the Teams cache?
Clearing the cache is a targeted troubleshooting step for issues with the local desktop app, not a universal solution. Microsoft specifically does not recommend clearing the cache to troubleshoot missing chat messages or chat history, missing teams or channels, or incorrect notifications and unread counts. Doing so can remove diagnostic logs needed to investigate these problems.
For the latest official instructions, see Microsoft Learn: Clear the Teams client cache.
For more information or technical assistance, please contact Vietbay IT Team.
Hotline: 091 929 5529